Ingesting Raw Data into Snowflake: Why the Raw Layer Should Stay Raw
After designing the architecture, the next step in my project was straightforward on paper:
Load the Airbnb dataset from Amazon S3 into Snowflake.
At first, I thought this would be one of the easiest parts of the project.
The data already existed as CSV files.
Snowflake could read directly from S3.
A few SQL commands later, I would have my tables.
Simple.
Or so I thought.
As I started implementing the ingestion pipeline, I encountered a design question that seemed surprisingly difficult:
Should I clean the data while loading it into Snowflake?
For example:
- Should I rename columns to follow my preferred naming convention?
- Should I convert data types immediately?
- Should I remove columns I don't plan to use?
- Should I replace null values during ingestion?
Initially, my answer was yes.
It felt efficient.
Why store messy data if I already know how I want it to look?
But as I learned more about modern data platforms, I realized that this approach creates problems much larger than the ones it solves.
The Purpose of the Raw Layer
One of the biggest mindset shifts for me was understanding that the raw layer is not designed for analysis.
Its purpose is much simpler.
It is an immutable copy of the source data.
Think of it as a snapshot of what arrived from the source system.
Nothing more.
Nothing less.
This means the raw layer should answer one question:
"What data did we actually receive?"
Not:
"What data do we want?"
That distinction turns out to be incredibly important.
Why Not Clean the Data Immediately?
Imagine six months from now Airbnb adds five new columns to the listings dataset.
Or perhaps one of the existing columns changes format.
If the ingestion process already contains dozens of transformations, it becomes much harder to answer questions like:
- Was the issue introduced by the source system?
- Did our ingestion logic modify the data?
- Which transformation caused the problem?
By preserving an untouched copy of the source data, we always have a reliable starting point for investigation.
The raw layer becomes the source of truth for every downstream transformation.
The Architecture in Practice
For this project, the ingestion flow looked like this:
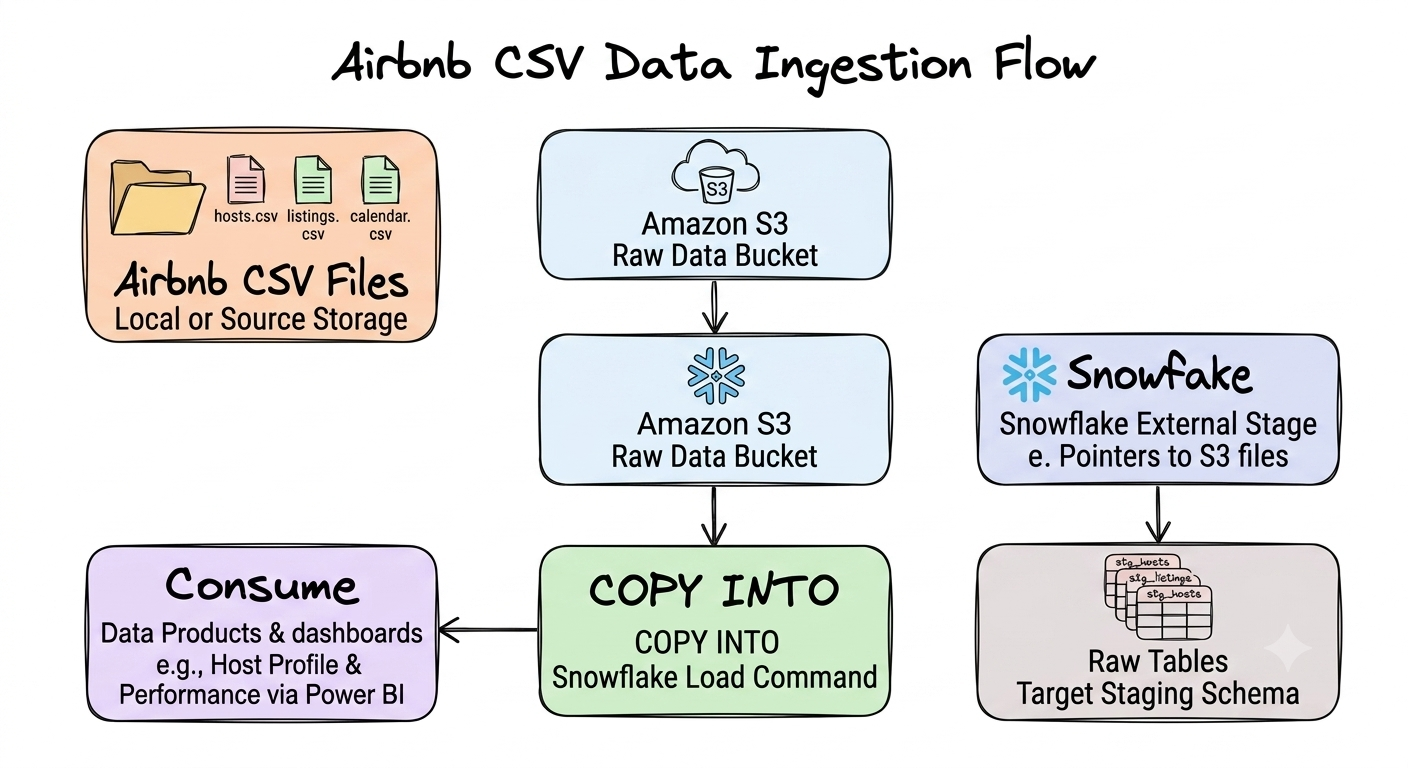
Notice something important.
At this stage there is no business logic.
No joins.
No calculated columns.
No filtering.
No data products.
The goal is simply to move data from cloud storage into the warehouse as faithfully as possible.
Why Amazon S3?
Although I could have uploaded the CSV files directly into Snowflake, I deliberately chose Amazon S3.
There were two reasons.
First, this reflects how many production analytics platforms operate.
Operational systems typically export files into cloud object storage before those files are ingested into the warehouse.
Second, separating storage from compute creates a more flexible architecture.
The warehouse can be rebuilt, refreshed, or expanded without changing where the raw files live.
Object storage becomes the durable landing zone for incoming data.
Loading the Data into Snowflake
Once the architecture was in place, the next step was implementing the ingestion pipeline that would bring the Airbnb dataset from Amazon S3 into Snowflake.
The implementation can be broken down into five steps:
- Create the Snowflake environment by setting up the database, schemas, and virtual warehouse.
- Configure a storage integration to securely connect Snowflake to Amazon S3.
- Create an external stage that points to the Airbnb dataset stored in S3.
- Define a file format so Snowflake knows how to interpret the CSV files.
- Load the data into raw tables using Snowflake's schema inference and the
COPY INTOcommand.
Although these steps are relatively straightforward to implement, each one contributes to building a clean, repeatable ingestion pipeline. More importantly, notice that none of these steps perform any transformations on the data. The goal is simply to move the data into the warehouse exactly as it exists in the source files.
Step 1: Creating the Snowflake Environment
Before loading any data, I created a dedicated database, a virtual warehouse for compute, and separate schemas for each layer of the analytics platform.
CREATE DATABASE AIRBNB_DB;

CREATE SCHEMA AIRBNB_DB.RAW;
CREATE SCHEMA AIRBNB_DB.STAGING;
CREATE SCHEMA AIRBNB_DB.INTERMEDIATE;
CREATE SCHEMA AIRBNB_DB.MARTS;

CREATE WAREHOUSE AIRBNB_WH
WITH
    WAREHOUSE_SIZE = 'XSMALL'
    AUTO_SUSPEND = 60
    AUTO_RESUME = TRUE;

USE WAREHOUSE AIRBNB_WH;
USE DATABASE AIRBNB_DB;
Even though only the RAW schema is used in this article, I intentionally created all of the schemas upfront. This mirrors the layered architecture introduced in the previous article and provides a clear place for every model as the project evolves.
Step 2: Configuring Secure Access to Amazon S3
Since the Airbnb dataset is stored in Amazon S3, Snowflake first needs permission to access the bucket. This is accomplished using a Storage Integration, which securely connects Snowflake to AWS through an IAM role.
USE ROLE ACCOUNTADMIN;

CREATE OR REPLACE STORAGE INTEGRATION my_s3_integration
TYPE = EXTERNAL_STAGE
STORAGE_PROVIDER = 'S3'
ENABLED = TRUE
STORAGE_AWS_ROLE_ARN = 'aws_role_arn'
STORAGE_ALLOWED_LOCATIONS = ('aws_s3_bucket_url');

DESCRIBE STORAGE INTEGRATION my_s3_integration;
Once the integration is created, Snowflake can securely communicate with the S3 bucket without requiring direct access keys inside SQL scripts.
Step 3: Creating an External Stage
With the storage integration in place, the next step is creating an external stage that points to the Airbnb dataset.
CREATE OR REPLACE STAGE airbnb_stage
URL = 'aws_s3_bucket_url'
STORAGE_INTEGRATION = my_s3_integration;

LIST @airbnb_stage;
The LIST command provides a quick validation that Snowflake can successfully access the files stored in S3. At this point, I could verify that the listings.csv, calendar.csv, and reviews.csv files were all available before attempting to ingest them.
Step 4: Defining the File Format
Before importing the data, Snowflake needs to know how to interpret the CSV files.
CREATE OR REPLACE FILE FORMAT csv_format
TYPE = CSV
FIELD_OPTIONALLY_ENCLOSED_BY = '"'
PARSE_HEADER = TRUE;
Separating the file format from the ingestion logic makes the pipeline reusable. If additional CSV datasets are added in the future, they can simply reference the same file format instead of redefining these settings.
Step 5: Creating and Loading the Raw Tables
One feature I particularly liked while building this project was Snowflake's INFER_SCHEMA function. Instead of manually defining every column, Snowflake can inspect the source file and automatically generate the table definition.
For example, the RAW.LISTINGS table was created using:
CREATE OR REPLACE TABLE RAW.LISTINGS
USING TEMPLATE (
    SELECT ARRAY_AGG(OBJECT_CONSTRUCT(*))
    FROM TABLE(
        INFER_SCHEMA(
            LOCATION=>'@airbnb_stage/listings.csv',
            FILE_FORMAT=>'csv_format'
        )
    )
);
With the table structure in place, loading the data required a single COPY INTO command.
COPY INTO RAW.LISTINGS
FROM @airbnb_stage/listings.csv
FILE_FORMAT = csv_format
MATCH_BY_COLUMN_NAME = CASE_INSENSITIVE;
Finally, I verified that the data had been successfully ingested.
SELECT *
FROM RAW.LISTINGS
LIMIT 10;
The exact same pattern was repeated for the remaining datasets.
For the calendar data:
CREATE OR REPLACE TABLE RAW.CALENDAR
USING TEMPLATE (
    SELECT ARRAY_AGG(OBJECT_CONSTRUCT(*))
    FROM TABLE(
        INFER_SCHEMA(
            LOCATION=>'@airbnb_stage/calendar.csv',
            FILE_FORMAT=>'csv_format'
        )
    )
);

COPY INTO RAW.CALENDAR
FROM @airbnb_stage/calendar.csv
FILE_FORMAT = csv_format
MATCH_BY_COLUMN_NAME = CASE_INSENSITIVE;
For the reviews data:
CREATE OR REPLACE TABLE RAW.REVIEWS
USING TEMPLATE (
    SELECT ARRAY_AGG(OBJECT_CONSTRUCT(*))
    FROM TABLE(
        INFER_SCHEMA(
            LOCATION=>'@airbnb_stage/reviews.csv',
            FILE_FORMAT=>'csv_format'
        )
    )
);

COPY INTO RAW.REVIEWS
FROM @airbnb_stage/reviews.csv
FILE_FORMAT = csv_format
MATCH_BY_COLUMN_NAME = CASE_INSENSITIVE;
At this point, all three Airbnb datasets had been successfully loaded into Snowflake. Most importantly, the data remained exactly as it appeared in the original source files. No columns had been renamed, no values had been cleaned, and no business logic had been applied.
That separation is intentional.
The responsibility of the ingestion layer is simply to move data into the warehouse safely and reliably. Every transformation including standardizing column names, correcting data types, handling missing values, and implementing business logic belongs in the next layer of the architecture.
By resisting the temptation to "fix" the data during ingestion, we preserve a trustworthy raw copy that can always be traced back to the original source. This foundation becomes invaluable as the project grows and more complex transformations are introduced.
Looking Ahead
At this point, the data had successfully reached Snowflake.
It was stored exactly as it appeared in the source files.
However, the tables were still far from ready for analysis.
Column names were inconsistent.
Data types needed refinement.
Business-friendly naming conventions didn't exist.
The next step wasn't dimensional modeling or dashboards.
It was something much more fundamental.
In the next article, we'll build the staging layer in dbt and explore why modern analytics engineering projects rarely transform raw data directly. We'll see how a seemingly simple layer becomes one of the most important foundations of a maintainable analytics platform.